Submitted by vince on

The Paragraphs module for the Drupal 8 CMS is still utilizing text fields with the same ckeditor limitations I discussed here. However, it does have some nice features over just using the default single text entry box for the body of your content. Most notably, in conjunction with the Classy paragraphs module, the ability to define an arbitrary number of classes that you can select from to style your paragraphs and images. IMHO, the Classy paragraphs module should be part of the main Paragraphs module because that is what gives it the main advantage over just entering your content in the main body field, other than the ability to rearrange paragraphs as blocks using drag and drop.
This article provides instructions on how you can use it as a method to style and wrap text around your images since ckeditor is so crippled in Drupal 8. This was written for Drupal 8.4.5 and Paragraphs 8.x-1.2.
There are some methods of doing it without using Paragraphs, as well, which I discussed here.
Note that After figuring this out, I discovered that the Insert module does not work with Image fields of Paragraphs. That really restricts my ability to use Paragraphs for image galleries, such as with Colorbox, because I don't have any control over where in the content the images are placed. I couldn't get Colorbox to work without using Image fields. Details of the problems are discussed below, after the instructions.
I could not find any documentation that didn't involve complex procedures of customizing the paragraphs module or modifying theme templates. I didn't want to have to delve into theming or module writing for simple content formatting such as floating text around my images and adding borders and margins.
Also, I didn't want my content layout to have any ties to the theme, giving me the freedom I have always had with Drupal 7, to switch themes.
I found one set of concise instructions for aligning text and images using paragraphs from DarkDust.
https://drupal.stackexchange.com/questions/193722/inline-images-that-can-be-enlarged
It is well written, however, his procedure involves approximately 53 steps including customizing your theme template. And in the end, his hard coded CSS code to do it still came down to including a simple "float: left".
If you insert an image into the text area using the image button or the IMCE image button (if you have IMCE installed), you can float the image to either side in css_injector using the class for the specific paragraph type.
For example, I made a paragraph labeled "Image left of text". It automatically attached a class to it named "paragraph--type--image-left-of-text". So, in css_injector, I added CSS code,
I had a hard time figuring out how to use it from available documentation. The instructions on the module site was very terse. So here are my instructions. This is assuming you have already installed and enabled both Paragraphs and Classy paragraphs.
This is normally where the Insert module comes in. You disable display of the Image field under "Manage display" and it allows you to upload images to Image fields and insert them where you choose into your content by placing the cursor in the text field where you want the image placed and clicking the insert button next to the Image field. However, the Insert module does not seem to work with the Paragraphs module.
I click the "Browse" button of the image field of a paragraph and select an image to upload and it fills in the name in the field to the right, but does not upload it. If I go ahead and click "Save" at the bottom of the page, it just loads a white blank page and never comes back.
As long as I disable the Insert module by selecting "Image" rather than "Image Insert" as the widget type under "Manage form display" for the Paragraph type, the Image field works.
So, I think that, until they fix it to work with "Insert" or I find and alternative, the image field is not very useful in Paragraphs for us.
This article provides instructions on how you can use it as a method to style and wrap text around your images since ckeditor is so crippled in Drupal 8. This was written for Drupal 8.4.5 and Paragraphs 8.x-1.2.
There are some methods of doing it without using Paragraphs, as well, which I discussed here.
Note that After figuring this out, I discovered that the Insert module does not work with Image fields of Paragraphs. That really restricts my ability to use Paragraphs for image galleries, such as with Colorbox, because I don't have any control over where in the content the images are placed. I couldn't get Colorbox to work without using Image fields. Details of the problems are discussed below, after the instructions.
I could not find any documentation that didn't involve complex procedures of customizing the paragraphs module or modifying theme templates. I didn't want to have to delve into theming or module writing for simple content formatting such as floating text around my images and adding borders and margins.
Also, I didn't want my content layout to have any ties to the theme, giving me the freedom I have always had with Drupal 7, to switch themes.
I found one set of concise instructions for aligning text and images using paragraphs from DarkDust.
https://drupal.stackexchange.com/questions/193722/inline-images-that-can-be-enlarged
It is well written, however, his procedure involves approximately 53 steps including customizing your theme template. And in the end, his hard coded CSS code to do it still came down to including a simple "float: left".
Instructions
These instructions involve nothing but back end configurations and the use of css_injector from the asset_injector module.If you insert an image into the text area using the image button or the IMCE image button (if you have IMCE installed), you can float the image to either side in css_injector using the class for the specific paragraph type.
For example, I made a paragraph labeled "Image left of text". It automatically attached a class to it named "paragraph--type--image-left-of-text". So, in css_injector, I added CSS code,
  div.paragraph--type--image-left-of-text img {
      float: left;
  }
and it worked. Again, here is a good place to also add any borders or other styling you need.Classy paragraphs
If you use Paragraphs, I highly recommended that you also install the Classy paragraphs module. This gives you the ability to define an arbitrary number of classes that you can select from to style your paragraphs and images. This way you do not have to create a different paragraph type for each layout, such as floating images left or right.I had a hard time figuring out how to use it from available documentation. The instructions on the module site was very terse. So here are my instructions. This is assuming you have already installed and enabled both Paragraphs and Classy paragraphs.
-
If you have not created any paragraph types yet, then go to
structure -> Paragraphs types
and add a paragraph type. It is just like adding a content type.
Add a field of type Text (formatted, long).
Give it a label to show on the form, such as "Content" or "Body" and click "Save and continue".
You should probably only need to set the "Allowed number of values" to 1. You will have the option of setting an unlimited number of these paragraphs when you add a paragraph field to a content type.
Click "Save field settings".
Click "Save settings".
You will also need to add a paragraph field to the appropriate content types, such as "Article" or "Basic page". -
Go to structure -> classy_paragraphs_style
and create one or more styles. For each style, give it any label you choose and list all classes you would like to apply to the style.
For example:
You might want a style called something like "inline images" for default styling such as margins and/or borders around images, and a style called "float left" and one called "float right" for selecting image positions within your content. -
Add a classy paragraphs style field to the paragraph type.
- Go to structure -> Paragraph types -> <paragraph type> -> Manage fields
- Click "Add field".
- Select "Other..." under "Reference".
- Give it a label, such as "Paragraph styles".
-
For "Type of item to reference", select "Classy paragraphs style" under "Configuration".
For "Allowed number of values", you can select unlimited if you don't want to limit the number of classes that can be applied to the paragraph type.
Click "Save field settings". -
Now you are in the edit screen. If you want any default styles, such as "Float image left", to float images, then enter them now under "DEFAULT VALUE".
Note: Any styles you add here must have already been added to the list of styles under
Structure -> Classy paragraphs style
The field will auto complete with available styles.
Otherwise you can just click "Saved settings". -
If you have just saved the settings from the previous step and are in the "Manage fields" screen still, click the "Manage form display" tab at the top. Otherwise, go to
structure -> Paragraphs types -> >paragraph type> -> Manage form display
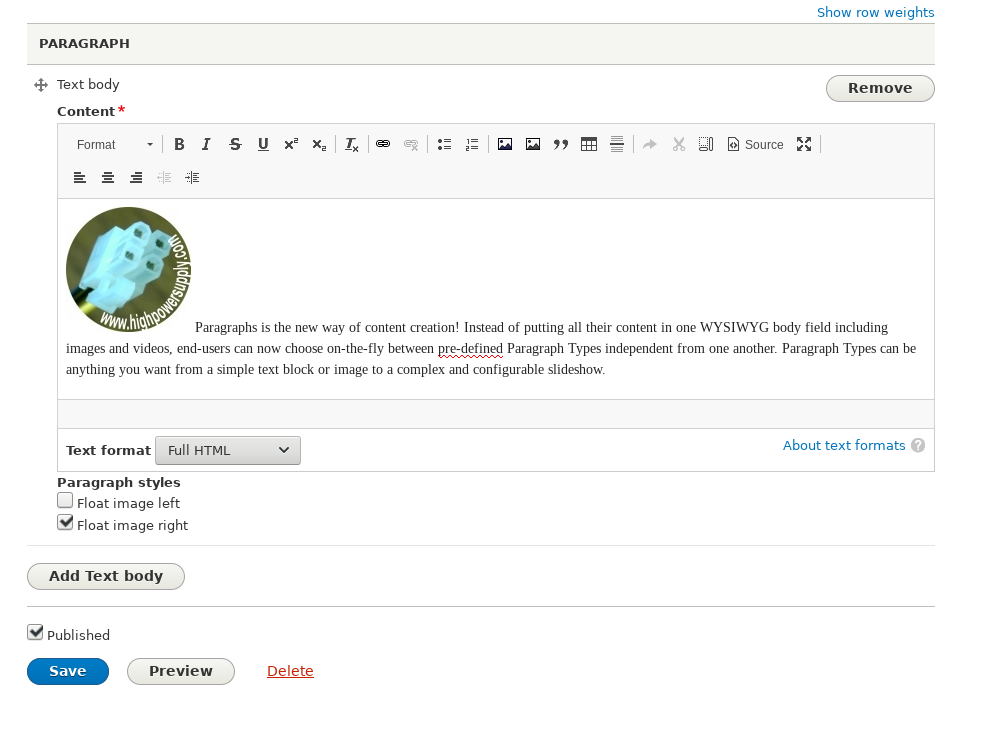
Make sure the "Paragraph styles" field you just created is enabled. Here you can also set the widget to auto complete or check boxes, etc for the Available CSS classes. I like to use Check boxes here. This is so that you will be able to select which styles to apply to each paragraph on the content editing screen. The screenshot shows what it looks like using check boxes with a couple styles defined. One for floating images left and one for floating them right.
-
Click the "Manage display" tab at the top or go to
structure -> Paragraphs types -> <paragraph type> -> Manage display
Disable display of your Paragraph styles. You don't want it displayed on the front end.
-
You can configure the styles in css_injector so that you don't have to do any custom theme modifications. For example, if you created a float-left and a float-right class, for your images, you can add,
  .float-right img {
      float: right;
  }

  .float-left img {
      float: left;
  }
Note:
Keep in mind that any CSS you add via css_injector, such as floating images left or right, will not be reflected in the back end inside ckeditor unless you also customize ckeditor's style sheets with those same styles. But it should look right when rendered in the front end.
Problems with Paragraphs, Image fields, and the Insert module
When the image field is enabled under "Manage display" for the paragraph type, in the front end it just places it above or below the text, depending on the order of the fields. Adding my own "float:" property in CSS does not seem to do any good because the images from the Image fields are apparently placed in a different block.This is normally where the Insert module comes in. You disable display of the Image field under "Manage display" and it allows you to upload images to Image fields and insert them where you choose into your content by placing the cursor in the text field where you want the image placed and clicking the insert button next to the Image field. However, the Insert module does not seem to work with the Paragraphs module.
I click the "Browse" button of the image field of a paragraph and select an image to upload and it fills in the name in the field to the right, but does not upload it. If I go ahead and click "Save" at the bottom of the page, it just loads a white blank page and never comes back.
As long as I disable the Insert module by selecting "Image" rather than "Image Insert" as the widget type under "Manage form display" for the Paragraph type, the Image field works.
So, I think that, until they fix it to work with "Insert" or I find and alternative, the image field is not very useful in Paragraphs for us.